
Appearance
The Appearance page of Nilesoft Shell Pro sets how Shell's menus look: the theme, colours, font, background effect, corners, border and shadow. A live preview on the right shows the menu on your own wallpaper as you change things, and nothing reaches your menus until you press Save.
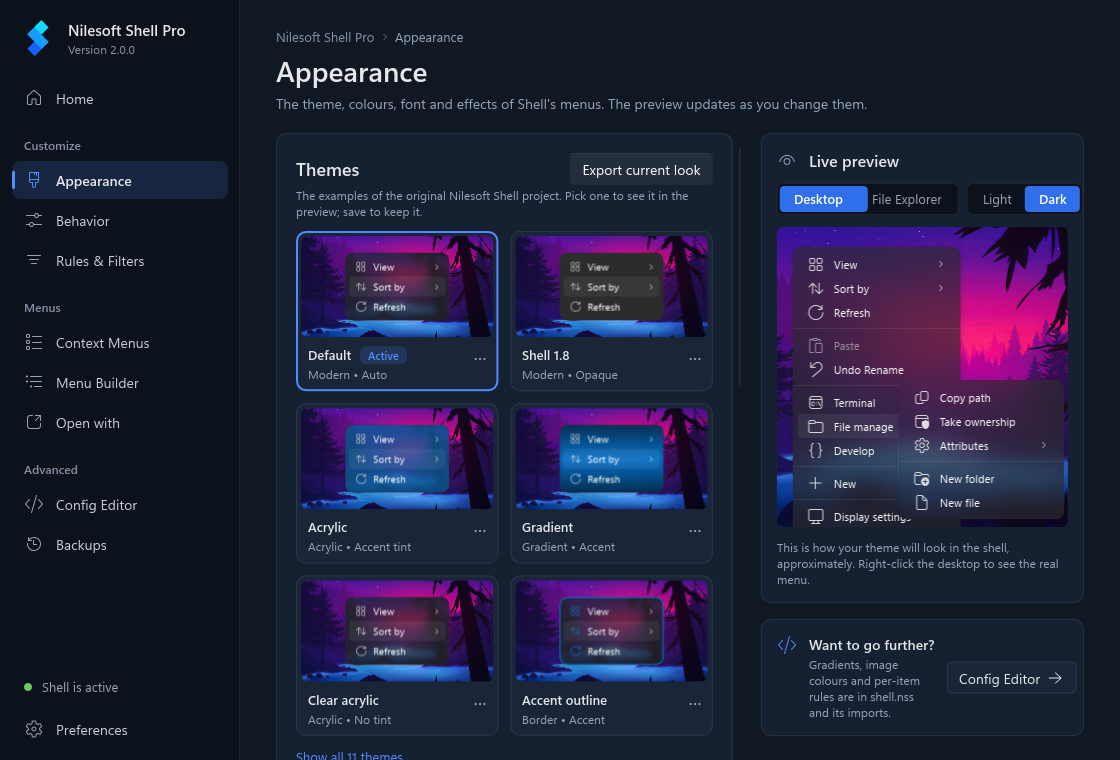
What's on the page
From top to bottom on the left:
- Themes: ready-made looks, one card each (see the Themes gallery).
- Base theme: the built-in style everything else sits on: Auto (like Windows' own menu), Modern (rounded, roomy rows), Classic (compact rows, blue highlight), White (the Modern shape, always light) and Black (the Modern shape, always dark).
- The theme in use: a small picture of your current look, its base theme, and a badge:
In use when it is saved, Not saved yet when you picked another one and haven't saved. Under it are four
tabs:
- Colors: six swatches (Background, Text, Highlight, Highlighted text, Disabled text, Border) and Dark mode (Auto, On, Off). Auto follows the Windows app mode.
- Typography: font, size, weight and density (Auto, Compact, Small, Medium, Large, Wide).
- Effects: the background effect, tint and opacity; menu and item corners; border; shadow.
- Advanced: item padding and margin, image size and gap, the highlight of a disabled item, and separators.
On the right are the Live preview and Want to go further?, which opens the Config Editor for what this page doesn't cover: gradients, image colours and rules for single items.
Where each value comes from
Under every setting a short grey line says where its value comes from:
| Built-in default | Nothing in your files sets it; Shell uses its own default. |
| From theme.nss, line 12 | Your own file sets it, at that line. |
| Set by this app | You changed it here and saved. If one of your files also has a value, the line says so, for example Set by this app · theme.nss, line 12 has 100. |
| Changed here · not saved yet | You changed it and haven't saved. |
| Back to theme.nss, line 12 · not saved yet | You pressed Reset; after saving, the file's value applies again. |
A filled dot next to a setting's name means this app sets it. A hollow dot means a reset is waiting for Save.
Some files set a value with an expression instead of a plain value, for example
if(sys.is11, 2, 0). The app can't work out what an expression gives, so it says Set by an expression
(theme.nss, line 12). Changing it here overrides it. with a link, Edit in Config Editor. The control still
works: if you change it, the app writes its own value, which wins over the expression. Your file is not changed. The
preview can't evaluate an expression either, so it shows the built-in default for that setting until you change it.
The Themes gallery
The Themes card has the example themes of the original Nilesoft Shell project. Each card is a small menu drawn in that theme over your wallpaper, with its name and two tags. The theme you are using is marked Active. When the window is too small for every card, Show all 11 themes under the cards shows the rest.
| Default | The look Shell ships with, imports/theme.nss: modern, following
Windows. |
| Shell 1.8 | The theme of the 1.8 shell.nss
(26b7dfd): modern, without the blur effect. |
| Acrylic | Acrylic tinted with the accent colour, from the README screenshot, as the maintainer posted it in discussion #174. |
| Gradient | An accent gradient from dark to light and back, also from discussion #174. |
| Clear acrylic | Modern with plain acrylic and no background colour, from issue #348. |
| Accent outline | A 1 px accent-coloured border and accent icons, from issue #162. |
| Flat | No border, no shadow, square item highlights, from issue #79. |
| Blue, Gray, Green, Yellow | The Shell 1.x colour templates in
templates/themes, ported value for value to
today's theme keys: white on deep blue, white on grey, black on green, white on olive. |
The … button on a card has Apply and Export to clipboard.
Export copies the theme's theme{} block with its credit, ready to paste into a .nss file of
your own. Export current look, at the top of the card, copies every theme setting in effect, saved or
not.
Apply a theme from the gallery
- Open Appearance. If the theme you want isn't shown, click Show all 11 themes.
- Click the card (or open its … menu and choose Apply). With the keyboard, use the arrow keys and press Space or Enter.
- If you have already changed theme settings in this app, it asks first: It replaces the N theme settings changed in this app, saved or not. Your own .nss files stay as they are, and nothing is written until you save. Click Apply to go on, or cancel.
- The preview shows the theme at once, and a message says <name> is in the preview.
- Press Save (or Ctrl+S) to use it in your menus, or Discard to go back.
theme.nss,
still applies under it, and the card pictures already show it that way.
Change the background colour
- Open the Colors tab and click the Background swatch.
- Pick a colour, or type it in the box under the palette as
#RRGGBBand press Enter (the#is added if you leave it out). - Check the preview, then Save.
The other swatches work the same way. Text, Highlight, Highlighted text, Disabled text and Border can also have an
alpha (see-through) value, #RRGGBBAA.
Get a stronger acrylic
Acrylic is the blurred desktop with a tint (a colour) over it. How much of the blur you see depends on
the tint's alpha: around 40 is light, and FF hides the blur completely. Shell's dark Modern
theme uses #2C2C2C40, a light tint.
- Make sure Windows Transparency effects is on: Windows Settings > Personalization > Colors.
- Open the Effects tab. Under Effect, choose Acrylic.
- In Tint, type a colour with a higher alpha, for example
#2C2C2CB0, and press Enter. Or click the swatch and raise its alpha. - Leave Opacity on Auto (or 0 %), so the background colour doesn't cover the effect.
- Check the preview, then Save.
The Effect choices, as Shell reads them:
| Auto | Acrylic on Windows 11 and blur on Windows 10, even when Windows Transparency effects is off. |
| None | A solid menu. Opacity doesn't apply. |
| Transparent | The background colour at its opacity, with no blur. |
| Blur | The blurred desktop behind the menu, with the tint over it. |
| Acrylic | The blurred desktop with the tint over it, as Auto gives on Windows 11. |
If no effect is set at all, Shell uses acrylic while Windows Transparency effects is on and no effect while it is off. Blur and Acrylic need Transparency effects: with it off, Shell draws the menu solid, and the Effect line says so. Auto is the one choice that works with it off.
When you choose an effect and your files set the opacity to 100 (solid, which would hide the effect), the app sets the
opacity back to Auto for you. A tint written as effect = [3, tint, opacity] in your files is kept when you
switch between Blur and Acrylic; a tint you set here is written as background.tintcolor, which wins over
it.
Round or square corners
- Open the Effects tab and find Shape.
- Under Menu corners, click one of the five tiles: 0, 4, 8, 12 or 16 px. 0 px is square.
- Under Item corners, do the same for the highlight of each item.
- Save.
Shell stores corners as a step from 0 to 4, so 8 px is written as 2.
Change the font size
- Open the Typography tab.
- Move the Size slider (6 to 32 px). It starts at the size in effect; Modern uses 14 px.
- To use another typeface, click Font and search your installed fonts.
- Save.
A size other than the default scales the whole menu, as Shell does: rows, icons and spacing grow with the text.
Light and dark preview
The live preview draws the menu over your own wallpaper, blurred for blur and acrylic.
- Desktop or File Explorer shows the menu you get on the desktop or on a file, with a submenu open.
- Light or Dark shows the menu as it looks when Windows is in light or dark app mode. It starts on your current Windows mode. If Dark mode on the Colors tab is On or Off, or the base theme is White or Black, both look the same.
The preview is close but not exact. To see the real menu, save and right-click the desktop.
Reset one value
- Find the setting. If this app sets it, there is a Reset link next to its name.
- Click Reset. The grey line changes to Back to theme.nss, line N · not saved yet, or Back to the built-in default · not saved yet.
- Save. The app removes its value from
imports\settings-app.nss, and your file's value (or the default) applies again.
A change you haven't saved yet can be reset the same way; it is simply dropped.
Save and Discard
Changes on Appearance, Behavior and Rules & Filters wait in the footer at the bottom of the window, which shows how many there are (3 unsaved changes).
- Save (or Ctrl+S) writes them. When it is done the footer says Saved · Shell reloads on next right-click. There is nothing to restart.
- Discard drops every unsaved change on these three pages and puts the controls back.
Before anything is written, the app checks the whole configuration with
shell -config:check on a temporary copy. A configuration Shell would
reject is not written; the footer says Shell rejected the config, nothing was written: and the reason. If the
check passes, the app takes a snapshot of your files (listed on the Backups page), writes them, and then watches
Shell for a few seconds. If Shell fails to load the new files, the previous ones are put back and the footer says
Shell rejected the config, rolled back.
If Shell is reading the shared configuration in its install folder, which the app never changes, Save asks
Use a personal config?. Create and save makes your own copy in %APPDATA%\Nilesoft\Shell
(shell -config:init) and saves there.
What it writes
Only the settings you change are written, to imports\settings-app.nss next to your shell.nss.
The app owns that file and rewrites it on every save, so don't edit it by hand. The first save also adds this line at
the end of shell.nss, so the file is read last and its values win over your own theme:
import 'imports/settings-app.nss'After choosing Acrylic, typing the tint #2C2C2CB0 and picking 8 px menu corners,
imports\settings-app.nss contains:
// generated by Nilesoft Shell Pro, do not edit

theme
{
	background.effect = 3
	background.tintcolor = #2C2C2CB0
	border.radius = 2
}
A colour picked with the swatch instead of typed is written in lower case (#2c2c2cb0), which Shell reads
the same way. Item corners are item.radius, the font size font.size, and the background
colour background.color. See Themes for every key.
Known limitations
- The taskbar menu can't be acrylic on Windows 11. It stays opaque whatever the Effect is set to.
- The preview is approximate. It is drawn by the app, not by Shell: fonts, icons, the blur and values set by expressions can differ a little from the real menu. Right-click the desktop after saving to check.
- Gradients, image colours and rules for single items aren't on this page. Use the Config Editor for those.
Troubleshooting
The change doesn't show in my menus.
- Check the footer: if it still counts unsaved changes, press Save. Shell reloads on the next right-click after a save.
- If the footer shows Shell rejected the config, the reason after it names the file and line. Fix it in the Config Editor and save again.
- You changed the background colour under Blur or Acrylic: raise Opacity (see above).
- You are looking at the taskbar menu on Windows 11, which stays opaque.
Acrylic or blur looks solid.
- Windows Transparency effects is off. Turn it on in Windows Settings > Personalization > Colors, or choose Auto as the Effect, which Shell applies even with it off.
- The tint's alpha is
FF, or the tint has no alpha at all (#RRGGBBcounts asFF). Lower it, for example toB0or40. - Opacity is at 100 %. Move it down, or reset it.
A value comes from an older theme.nss.
- The grey line under the setting says which file and line set it (From theme.nss, line 12). A
theme.nssfrom an older Shell version, or one you copied from somewhere, keeps applying under any theme you pick here. - To change it for good, change it here and save: the app's value wins and your file is left alone. Or open the file in the Config Editor and remove or edit the line.
- Old themes often set
opacity = 100, which hides blur and acrylic. Choosing Blur or Acrylic here sets the opacity back to Auto for you.